The following is a summary of most of the commands, functions, and special variabls relating to motion of sprites in GlitterIDE.
There are two ways to move a sprite. One is to move it to a specific position and at a specific angle, the other is to move relative to where it currently is. The basic commands to move relatively are "forward()", "turnLeft()", and "turnRight()".
forward(distance);
Move the sprite forward the specified number of pixels. Negative values will move the sprite backwards.
turnLeft(degrees);
Turn the sprite left (anti-clockwise) the given number of degrees. Degrees go from 0 to 360 in a circle. Negative degrees will turn right.
turnRight(degrees);
Turn the sprite right (clockwise) the given number of degrees. Degrees go from 0 to 360 in a circle. Negative degrees will turn left.
The movement commands have shorter versions which work exactly the same. The commands "move()", and "fd()" can be used like "forward()", "tl()" can be used in place of "turnLeft()", and "tr()" in place of "turnRight()".
For example: move in a triangle shape:
	flag {
		penDown();

		forward(100);
		turnLef(120);

		move(100);   //same as forward(100)
		tl(120);             // same as turnLeft(90)

		fd(100);         // same as move(100) or forward (100)
		tl(120);

		penUp();
	}
Note that "penDown()" is the command to make the sprite leave a trail when moving, and "penUp()" turns the trail off. Turning left 120 degrees three times means to turn 3 x 120 = 360 degrees in total, which completes a full circle.
The alternative approach to moving relative to where the sprite currently is, is to move to set position on the stage, and to turn to a specific direction. In this regard, one is still moving relative, but relative to the stage, not the sprite. When working with this approach one needs to understand the idea of co-ordinates.
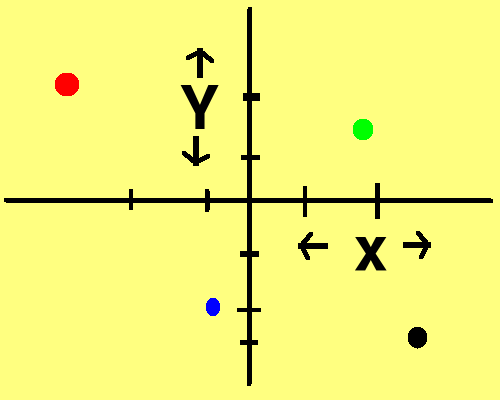
A point on the stage is represented by two numerical values. These are the "x" and "y" co-ordinates. The "x" co-ordinate is the horizontal position, and the "y" co-ordinate is the vertical position.
The "x" co-ordinate increases as we move right across the stage, with 0 representing the middle of the stage. Positions to the left of the center have a negative "x" co-ordinate, and positions to right of the center have a positive one.
The "y" co-ordinate increases as we move upt across the stage, with 0 representing the middle of the stage. Positions below of the center have a negative "y" co-ordinate, and positions above the center have a positive one.
In the above diagram the red circle may have a co-ordinate of (x,y)=(-100, 100), the blue may have a co-ordinate of (x,y) = (-20,-80), the green (x,y)=(80,40), and the black (100,-100). (Diagram not to scale...).
In the standard stage/view size (mirroring Scratch), the "x" co-ordinate goes from -240 on the left, to 240 on the right, and the "y" co-ordinate goes from -180 at the bottom, to 180 at the top.
There are a few ways to move the sprite to a specific co-ordinate. The first is "goXY(x, y)", which takes two values, being the "x" and "y" values. For example:
	flag {
		goXY( -100, 100 );
		waitTime(1);

		goXY( -100, -100 );
		waitTime(1);

		goXY( 100, -100 );
		waitTime(1);

		goXY( 100, 100 );
	}
The next way is to access the spriteX, and spriteY variables. These are system variables that can be assigned a value to change the x, or y coordiate, and accessed to read the position. For example:
	flag {
		print("Current position:", spriteX,", ", spriteY);
		goXY( -100, 100 );
		print("New position:", spriteX,", ", spriteY);
		waitTime(1);

		spriteY = -100;
		waitTime(1);

		spriteX = 100;
	}
The spriteX, and spriteY variables can also be used for relative position, by adding values to the variables. For example:
	flag {
		spriteX = spriteX + 20; //Move 20 pixels to the right
		spriteX = spriteX - 40;  //Move 40 pixels to the left

		spriteY += 20;      //Move 20 pixels up
		spriteY -= 40;  //Move 40 pixels down
	}
To move progressively over a period of time, the glideTo(x, y, time) command can be used. This functions like the goXY() command, but has an additional time parameter (in seconds), which details how long the movement should take. The script does not continue until the sprite has reached its destination.
Relative gliding can be done by using the spriteX, and spriteY variables. For example:
	flag {
		glideTo(100,100,2); //Take 2 seconds to go to position 100,100

		glideTo(spriteX-200, spriteY, 2);  //Take two seconds to glide 200 pixels left
	}
Like position, the direction of the sprite can changed to a specific direction. GlitterIDE has two ways of refering to the direction the sprite is facing. The first is direction or "heading", and the second is angle.
The "heading" of a sprite matches the way direction is referred to in Scratch. The heading is a value (in degrees), where the value 0 means to point directly up the screen, and increasing values mean to turn right, or clockwise, and decreasing values are to the left, or anti-clockwise. The directly left heading is "-90", and the directly right heading is "90". Directly down is "180" (or "-180").
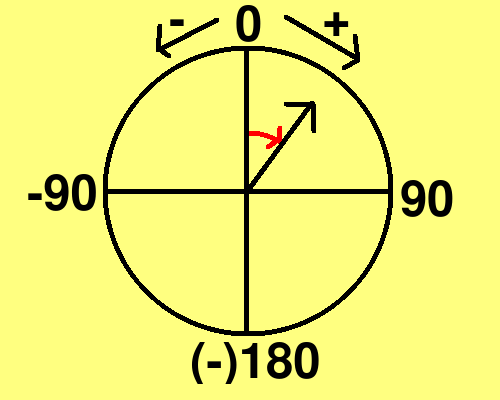
There are a multitude of ways to specify or check the heading/direction of a sprite. To read the direction, use either getHeading(), or getDirection(). To set the direction use setDirection(value), or setHeading(value). These functions read or set the direction based on a value that is defined as above.
Alternatively, like the spriteX, and spriteY variables, there is also a variable for direction. This is the direction variable (or alternatively, heading), and the direction can be changed by setting the variable directly. Relative changes are possible by refering back to variable. For example:
	flag {
		setHeading(90); //Face to the right
		setDirection(-90); //Face to the left
		heading = 0;  //Face up
		direction = 180; //Face down

		print("Current heading:",heading);
		print("Also:",getHeading());

		heading = heading+15; //Turn 15 degrees to the right

		//The following commands are equivalent
		direction-=15;
		turnLeft(15);
	}
The angle is described ina way more similar with traditional mathematical approaches, and is defined the angle from the horizontal axis. That is 0 when facing the right, and increasing as turning left, or anti-clockwise. With the angle, "90" degrees is straight up, "-90" is straight down. To the left is "180", or "-180".
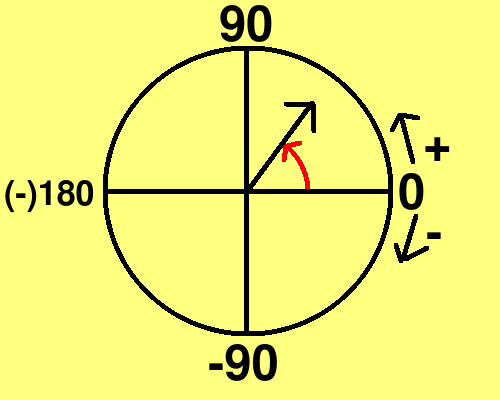
There are two ways to specify or check the angle of a sprite. To read the angle, use getAngle(). To set the angle use setAngle(value). These functions read or set the direction based on a value that is defined as above.
Alternatively, there is also a variable for angle, and this is, unsurprisingly, angle, and the angle can be changed by setting the variable directly. Relative changes are possible by refering back to the angle variable. For example:
	flag {
		setAngle(0); //Face to the right
		angle = 90;  //Face up

		print("Current angle:",angle);
		print("Also:",getAngle));

		angle = angle+15; //Turn 15 degrees to the left

		//The following commands are equivalent
		angle-=15;
		turnRight(15);
	}
In Scratch, sprites cannot move out of the stage. Attempting to do so will cause the sprite to become pressed against one of the borders. This can be called "fencing" (at least TurboWarp calls it this). The current version of GlitterIDE has fencing for the basic relative movement commands (forward()), but not for the absolute positioning methods. Future versions will have the option to turn fencing off completely (for now, not for Scratch export, but if there is interest it may be possible to hack it in, and to enable it for TurboWarp export).
Relative and absolute movements are the normal movement types, but, in keeping with Scratch, there are some other ways to move that are dependent on things external to the sprite. They are:
Direction/angle can also be set based on mouse, sprite, or random, through being able to point to certain things. The related commands are: